 I had to get another bodice out and going because I realized you weren't going to be able to see the tape against the black wool I was working with before.
I already had this fabric and lining cut out, but from picking up the loose pieces to the finish of the entire bodice to the point of putting the piping on it, it took me just over an hour to do both sides with hook and eye tape, make the back, and to sew the three pieces together, not to mention taking pictures of the process! It used to take me that long to sew individual hooks and eyes on my dresses, and the hook and eye tape seems to stay closed more securely.
This is the left side bodice with the eyes already sewn in on both fabrics and the darts already sewn through the fashion fabric and lining If you put bones in your darts, you can do that now as well, or right before you put the piping on, either way. The whip stitching of the front to the back which has the eye tape on it took me less than 10 minutes.
 I went to iron my fabric and found that Princess Grace had taken up residence on my ironing board. She's lying on my black wool dress pieces right now but graciously allowed me enough room to iron the bodice pieces so I could take pictures.
Did I mention how much I hate crappy Wal-Mart fabric? This fabric is unraveling as I look at it. I'd bought a bunch when I first started sewing, it's 100% cotton but the feel (the hand) of the fabric is horrible compared to decent quilting fabric. I'd long ago sold all the dresses I'd made with their fabric but I saw this piece in my stash and thought it would make an ok work dress but I'm not sure it's worth the aggrevation of having to work with it, it's distorting, doesn't tear well, unraveling, and just generally crappy. Ok, rant over. I know now to buy the best fabric I can afford and then I'm a happier seamstress.
 Sammy is asleep as usual in his bed on my cutting table, I guess I was ranting quietly enough that he didn't wake up. He is presently snoring, which is my constant sound effect in my sewing room. Sometimes my calico, Rose O'Neil Greenhow Kitty sleeps up in one of the boxes of fabric on the shelves in back of the ironing board.
Sammy is grey so he fits right in with all the Civil War fabrics I have lying around.
 I usually like to get the back ready between finishing the left and right sides of the bodice. I do a faux 3 piece back which is easier with my Bernina that has a movable needle position and a great edge stitching foot. The needle position can be changed so all I do put the edge stitching guide on the edge of the fabric fold and ride the edge of the folded over portion on my T-back and just move the needle over enough to sew it down nicely. Doing a false 3 piece back takes very little time and looks like I really pieced (and dealt with matching the plaid) the back when I didn't. I won't tell if you won't. I do know that certain body types don't do well without the give that the real 3 piece back provides, so having a fitting shell will show you what you need to do according to fit.
  Ok, back to the right side of the bodice. Remember that you had three lines drawn on your lining fabric? Put the fashion fabric and the lining fabric together and sew down the stitching line. This is the line closest to the opening. Use tiny stitches because you'll be making holes in this line, the stitching will keep the holes from fraying as badly. I stitched my line and it didn't line up perfectly with the plaid on the front fashion fabric so I had to restitch it to help situate the pattern in the right place.
 When you've stitched your line, fold the bodice on the fold line (the next line in, the middle line) and pin very close to the edge to keep your fold there. If the pins bother you, you can always baste it, but make sure you're really close to the fold, as you see here. Don't take the pins or the basting out until you've sewn on the piping or you'll lose the positioning of the fold and the center front. The center front will be approximately over the stitching line at this point, and it is where your hooks and eyes are going to be.
If you're doing trim on your bodice, remember that the center front is this line and not the fold of the bodice and take that into account or the trim will look like it's off by 1/2 inch. This also applies to applying your collar...best to find the center point of the dress (bodice plus back) and the center of your collar and then work towards the outsides when basting it on. Sorry, I know that's ahead of where we are now, but I wanted to make sure you were prepared.
 Now you're going to match up the pattern (if any) on the two sides of the bodice on the fashion fabric. If you cut the bodice pieces correctly this will line up pretty close to perfectly and you can adjust a little bit to make it fit if things are off just a little. See, my pins are still attached at the fold line on the right (on your left here) side bodice.
 Lie the right side over the left side, approximately getting the stitched line over where the eyes on your left side are. Match up the pattern on the fabric and put some horizontal pins into both halves. Remember because you're looking at the dress and not wearing it, your right is going to show on your left and your left on your right...you'll get used to it. Use a marker and mark the sides inside if it helps.
 Now take some tailor's chalk or a fabric water erasable marker and mark lines at every eye. Don't just measure them, some of them might be a bit distorted by how you sewed them into your left side. Your marks should go through your stitching line to show you where you'll put your hooks. If you haven't pinned the sides together so that the lines are on your stitching line, that's fine, we'll adjust in a moment.
 Here's a close up of my marks and the eyes that I'm matching up with. Take the horizontal pins out that were pinning both sides together, but leave in the pins that are holding your fold line.
 Now the fun begins. You need an awl or something else to poke holds in your fabric. I got this one at Joann's (with a coupon, of course), but you can get them at craft, leatherwork, and other stores.
  Coming from either side (usually I start from the front then enlarge the hole coming from the back) poke a hole at least large enough for your hooks on your hook side tape to come through, matching with the marks you drew, and trying to get your hole right into the middle of the stitching line.
 This is the part that will make you nuts the first few times you do it, but I promise it gets easier as you make more dresses. The trick is to make the hole big enough but not too big, and to push the hook through both thicknesses of fabric. Sometimes it takes a couple of tries.
 My marks were pretty far off the stitching line because I'd adjusted my fabric to get the pattern right on the front. It doesn't matter, just extend them along to where they need to be. The hook is going to be pointing out toward the opening of the bodice. It sometimes takes a couple of tries to get the hook through both thicknesses, and this horrible fabric was coming apart as I made the holes, but you get the idea.
 Start at one end or the other and the moment you have a hook through, put a pin in to hold the tape in place. Then move along to the next mark and put the next hook in and immediately pin it in through the tape as close to the hook as you can. If you don't pin it securely, the hook is going to pop out of the fabric and then you're going to utter 4 letter sewing terms, especially if the one that popped out happens to be in between two that are still in place. Ask me how I know.
Remember, keep those pins in the center fold. This is when basting that fold shut can help if you want to, especially on your first attempt at this.
 Here is my hook tape with all 11 of my hooks through, and the tape pinned into the underside of the right bodice. I started on the left making holes, and as I went, I pushed the heads of the pins all the way in to avoid them being in the way for the next hole.
 Here are those hooks coming through shown from the outside. Again, the fold is still pinned on the outer edge. I can't say that enough. Ask me how I know THAT too!
 The next step is to sew this tape in though both lining and fashion fabric. A lot of people I know do this by hand, if you do, try to get pretty close to the ends of the hooks. I do it by machine but it is very difficult and I've broken a lot of needles that way. Your zipper foot is probably the best way to get it sewn in, I try for the outside (away from the hook) edge to get tacked down, but it's hard when you get close to the hooks. Don't worry, do the best you can, the stitching is on the inside of the bodice and won't show. It isn't necessary to get in between the hooks, just sew a pretty straight line on the outer edge of the tape, they'll hold.
 The reason you haven't sewn your darts in yet is so that you can open up the lining from the fashion fabric at this point (making sure that fold is still securely pinned).
 Fold under the raw edge of fashion fabric and lining together and tuck the raw edge under the hook tape as far as you can leaving enough room on the edge against the lining to sew it down. I'm the only person I know that sews this by machine, but again, the edge stitch foot is great for this. If you can't get it by machine, just whip stitch it down, this finishes your raw edges, even if you have to do it by hand, it's quick.
  Almost done! Now just put the fashion fabric and the lining back down together, keeping the pins in the fold still, and sew your darts. Sew your bodice pieces together and you're ready to put on your piping, and all your edges in the front are finished! When you go to apply your piping, hook up the bodice and make sure that the bottom and top are even from right to left (adjust by snipping off a little bodice on one side or placing the piping a little bit up or down to match). As soon as you have put your piping on the neck and waistlines you can take the pins out of the front edge and the fold will stay.
You're done with the front, no hooks and eyes to sew by hand! If you want buttons on your dress for decorative purposes just sew them to the right bodice outside on top of the hooks or wherever else you'll want them. Most originals had non-functional buttons if they even had buttons at all... The top edge of your bodice will be fastened by your broach between the two edges of your collar.
Good luck with your hook and eye tape, and if you have any questions please let me know. :)

 Here my latest finished project. It's a cotton reproduction print about 1850's or so. With this hook and eye tape technique, you can cut the fabric so that the right and left sides are going to carry over your fabric pattern smoothly like in this large repeat floral print.
 The first thing you have to do is to make yourself a pattern piece that is different for the right and left. Here's a picture of the Period Impressions bodice pattern piece which is the same for both sides, just to use as the basis for your own adjusted pattern. Now I'm not recommending this pattern manufacturer or any other, in fact, my fitting shell is made from the Past Patterns darted bodice but I couldn't find it this morning to use. Your favorite pattern is fine.
  This is my left side pattern piece. This is the fashion fabric side, you'd flip it over to cut your lining. I know it's hard to see, but the seam line is drawn in on the pattern piece, and the cutting line is 1/2 inch past the seam line. Mark your cutting line on your left side pattern piece only. Now, cut out your new left pattern piece and mark it well as being the left. Make sure you write yourself a note on the pattern piece that you have to flip it for the lining... Most of us use muslin for linings so I have mine correct for the left bodice for the fashion fabric and just cut the muslin on the same pattern side.
 Here are my two marked linings lined up for you to see (and the right piece is sitting on the right, left is on the left like you'd cut the lining). I've drawn the lines on the lining pieces for you to see as well. Now use the cutting lines on your pattern to cut out your lining and your fabric, being sure to get the fashion fabric's pattern across the bodice to match up if there is one using the method above. I'm working on 3 dresses right now but none of them have a definite pattern on them to illustrate how to match it up, I do apologize, and if you need me to I will do a separate blog post for that. Just leave me a comment if so.
 You'll want to measure and cut your hook and eye tape so that the top hook/eye is no closer to the top of your bodice than 1.5 inches, and the bottom hook/eye is not any closer to the bottom than 1.5 to 2 inches. The top you'll need room if you're going to wear a broach, and the bottom you'll have your waistband and you're also leaving room to finish the bodice with your piping. I use 11 hooks and eyes, that's just me, I'm short waisted. I'm using silver hooks here but the only original hook and eye tape I've actually seen on garments was black painted hooks with black hooks and eyes. It's not going to show and I'm not entering any dress competitions with so I'm ok with using what I can get. I cut both of my tapes at this time and put the hook side aside for now.


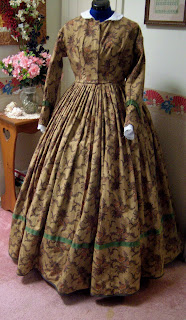
 This is my cotton outdoors dress that Mark picked out the fabric for. It's a reproduction print of an 1850's ish print. It's simple with a little bit of grosgrain ribbon trim and I probably won't put anything else on the bodice but I will as usual add a belt.